.
.The Remote Control
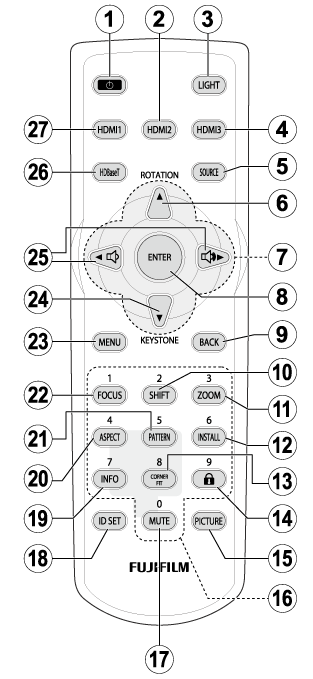
The names and functions of the buttons on the remote control are listed below.
| Item | Button | Function |
|---|---|---|
| A | Power | Turn the projector on or switch it to standby. |
| B | HDMI2 | Select HDMI 2. |
| C | LIGHT | Turn the button lights on for about 10 seconds. |
| D | HDMI3 | Select HDMI 3. |
| E | SOURCE | Display input source selection options. |
| F | ROTATION | Rotate the image up or down. |
| G | Selector(e/f/g/h) | Navigate the menus. |
| H | ENTER | Select the highlighted menu item. |
| I | BACK | Return to the previous menu. |
| J | SHIFT | Adjust lens shift. |
| K | ZOOM | Adjust zoom. |
| L | INSTALL | Display projection options. |
| M | CORNER FIT | Display corner fit options. |
| N | Remote control lock | Disable the remote control. Be sure to aim the remote at the remote receiver when performing this operation. |
| O | PICTURE | Adjust settings for the projected image. |
| P | 10-key pad | Use when entering the remote control ID. |
| Q | MUTE | Temporarily suspend projection and mute audio. Audio can be restored by pressing any other button or by pressing the MUTE button again. |
| R | ID SET | Enter the remote control ID. More information on entering an ID is available here. |
| S | INFO | View projector information. |
| T | ASPECT | Choose the aspect ratio. |
| U | PATTERN | Display a test pattern. |
| V | FOCUS | Adjust focus. |
| W | MENU | Display the menus used to adjust projector settings. |
| X | KEYSTONE | Display keystone compensation settings. |
| Y | Volume | Adjust the volume of the built-in speaker. |
| Z | HDBaseT | Select HDBaseT. |
| a | HDMI1 | Select HDMI 1. |
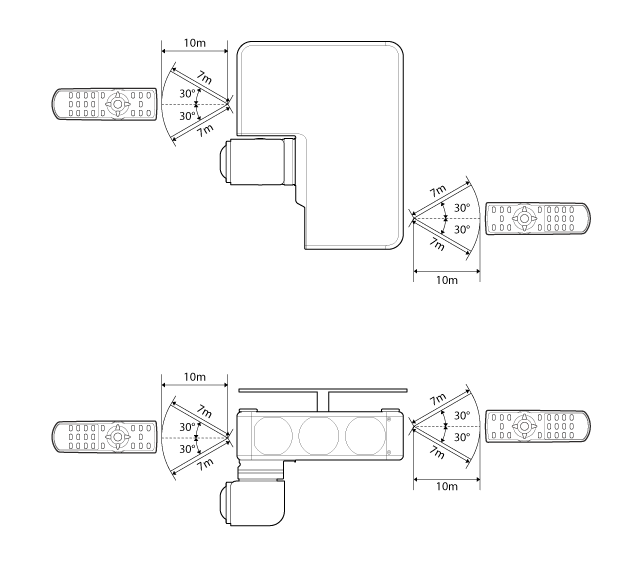
Remote Control Range