 .
.DISPLAY
Adjust projector display settings.
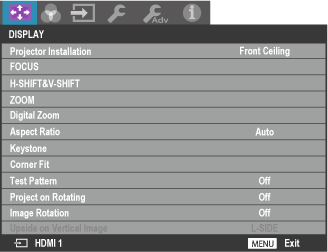
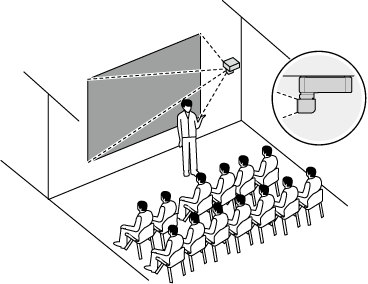
Projector Installation
Choose an option according to the location of the projector and screen.
-
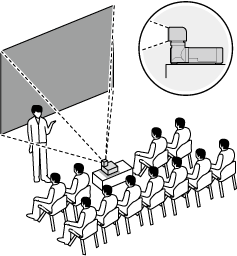
Front Table: Choose if the projector is on a table in front of the screen.
-
Rear Table: Choose if the projector is on a table behind the screen.
-
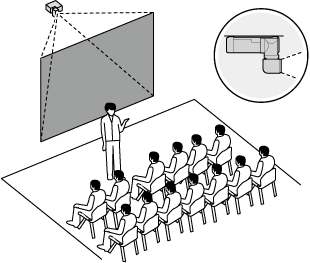
Rear Ceiling: Choose if the projector is suspended from the ceiling behind the screen.
-
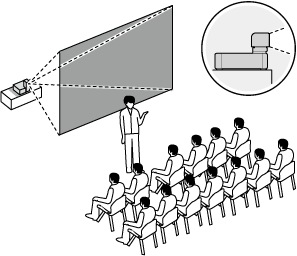
Front Ceiling: Choose if the projector is suspended from the ceiling in front of the screen.
 FOCUS
FOCUS
Adjust focus.
Press ENTER to display the focus dialog and use the selector (e/f/g/h) to adjust focus.
Adjust focus for a balance between the center and edges of the image.
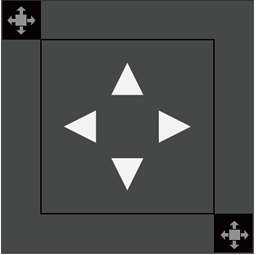
 H-SHIFT&V-SHIFT
Position the projected image using lens shift.
Press ENTER to display the lens shift dialog and use the selector (e/f/g/h) to position the image.
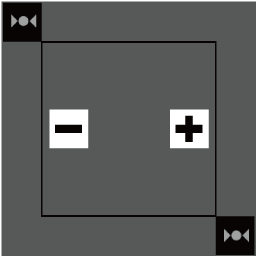
 ZOOM
ZOOM
Adjust the size of the projected image.
Press ENTER to display the zoom dialog and use the selector (e/f/g/h) to adjust the size of the projected image.
Select “−” to make the image smaller, “+” to make it larger.
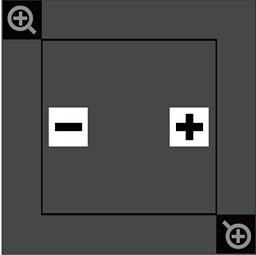
Digital Zoom
Adjust the size of the projected image using digital zoom.
Press ENTER to display the digital zoom dialog and then adjust the size of the image using digital zoom.
Aspect Ratio
Choose the aspect ratio of the projected image.
| Options | ||||
|---|---|---|---|---|
| Auto | Real | 4:3 | 16:9 | 16:10 |
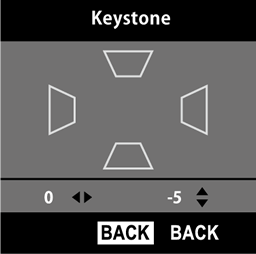
Keystone
Use keystone compensation to correct “keystoning” and make the sides of the projected image parallel the edges of the screen.
Press ENTER to display the keystone compensation dialog and use the selector (e/f/g/h) to correct keystone distortion.
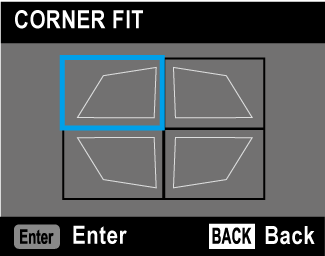
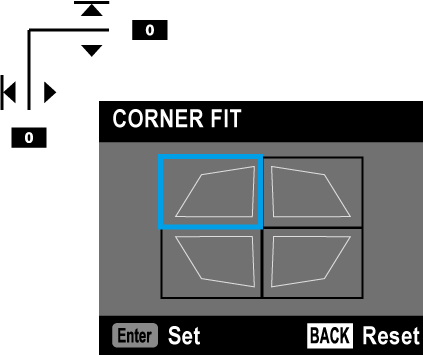
Corner Fit
Position the corners of the projected image to correct distortion.
-
Press ENTER to display corner fit settings.
-
Highlight a corner using the selector (e/f/g/h) and press ENTER.
-
Position the corner horizontally and vertically.
-
Press ENTER to save changes and exit.
bTIPS
Test Pattern
Choose a grid or other test pattern for display during installation.
| Options | |||
|---|---|---|---|
| 1 (cross hatching) | 2 (grayscale) | 3 (color chart) | Off |
bTIP
To turn the test pattern off, select Off in the menu or repeatedly press the PATTERN button on the remote control until the pattern is no longer displayed.
Project on Rotating
If On is selected, the projector lamp will remain on while the lens is rotated.
Image Rotation
If Auto is selected, the projector will automatically detect its orientation and rotate images to match.
Upside on Vertical Image
Choose whether the top of the image appears on the right (R-SIDE) or left (L-SIDE) when the projector is in portrait orientation.
bTIP
This setting applies only when Auto is selected for Image Rotation.