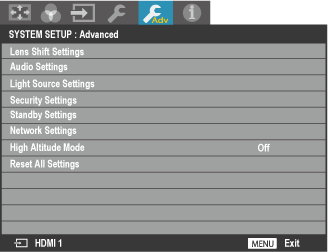
SYSTEM SETUP : Advanced
Adjust advanced system settings.

Lens Shift Settings
Adjust lens shift options.
Press ENTER to display options and then select the desired item.
Shift Area
Choose how much the lens can be shifted.
-
Limited: Lens shift is restricted, preventing any portion of the image being eclipsed.
A Lens centered
B Image shifted down and to the left: entire image visible

-
Full: The lens can be shifted throughout its range.
A Lens centered
B Image shifted down and to the left: bottom left corner of image not visible

Auto Lens Shift
If On is selected, the lens will automatically be restored to the last-used lens shift position after being rotated.
Audio Settings
Adjust audio settings.
Press ENTER to display options and then select the desired item.
Mute
Select On to mute audio.
Volume
Adjust volume.
Light Source Settings
Adjust light source settings.
Press ENTER to display options and then select the desired item.
Light Source Mode
Choose a light-source brightness mode.
| Options | ||
|---|---|---|
| Normal (100%) | Economic (70%) | Dimmer (25%) |
Dynamic Black
The projector automatically detects when the entire image is black and turns the laser off. The laser turns on automatically when the image changes.
Light Source Information
View information about the light source.
| Option | Description |
|---|---|
| Light Source Usage Time | The length of time the light source has been on. |
| Normal | The length of time the light source has been on with Normal selected for Light Source Mode. |
| Economic | The length of time the light source has been on with Economic selected for Light Source Mode. |
| Dimmer | The length of time the light source has been on with Dimmer selected for Light Source Mode. |
| Equivalent Light Source Hour | The length of time the laser has been on. |
Security Settings
Adjust security settings.
Press ENTER to display options and then select the desired item.
Change password
Press ENTER and change the password.
Change Security Settings
Press ENTER and adjust security settings.
Power on Lock
If On is selected, users will be prompted to enter a password when the projector is turned on.
This option applies only if a password has been specified.
Standby Settings
Adjust network standby settings.
Press ENTER to display options and then select the desired item.
Network
Press ENTER to display network standby options and then select the desired item.
-
Enable Network Standby Mode: Select On to enable network standby mode when the projector is on standby. The indicator lamp will flash amber.
-
Switch to Normal Standby Mode: Choose the network standby time.
Options Off 20 min 1 hr 3 hr 6 hr
Network Settings
Adjust network settings.
Press ENTER to display options, then adjust them as desired.
| Option | Description |
|---|---|
| Status | View network status. |
| DHCP | Select On when using the Dynamic Host Configuration Protocol (DHCP). |
| IP Address | Enter an IP address. |
| Subnet Mask | Enter a sub-net mask. |
| Default Gateway | Enter the default gateway address. |
| DNS Server | Enter a DNS server address. |
| Apply | Press ENTER to apply the above settings. |
High Altitude Mode
When using the product at high altitudes (above 1,500 m/4,900 ft), select Enable for High Altitude Mode to ensure that the product's internal temperature-control mechanism functions correctly. Failure to observe this precaution could shorten the life of the product's parts.
Reset All Settings
Reset all projector settings to their default values.
To reset settings, press ENTER to display a confirmation dialog, highlight Reset, and press ENTER again.
dCAUTIONS
-
Reset All Settings does not reset the following:
- DISPLAY > FOCUS
- DISPLAY > H-SHIFT&V-SHIFT
- DISPLAY > ZOOM
- SOURCE > INPUT
- SYSTEM SETUP : Basic > Language
- SYSTEM SETUP : Basic > Panel Key Lock
- SYSTEM SETUP : Advanced > Security Settings
- SYSTEM SETUP : Advanced > Network Settings
- SYSTEM SETUP : Advanced > High Altitude Mode
- A list of the settings restored by selecting Reset All Settings can be found here.
- To reset picture settings, select Reset Picture Setting in the PICTURE tab.

 .
.