
 .
.Remote control
Remote Control Button Names and Functions
The names and functions of the remote control buttons are as follows.
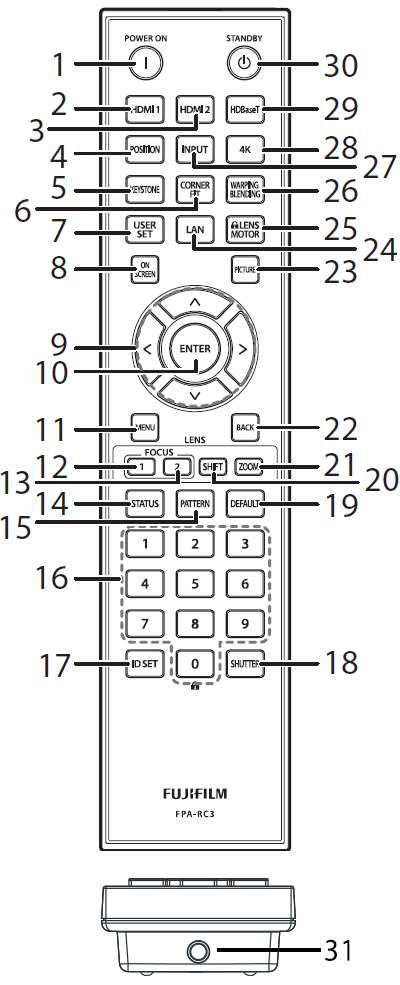
| No. | button name | Description | |
|---|---|---|---|
| 1 | POWER ON | Turn the power supply On. | |
| 2 | HDMI®1 | Select HDMI® 1. | |
| 3 | HDMI® 2 | Select HDMI® 2. | |
| 4 | POSITION | Select the projector position. | |
| 5 | KEYSTONE | Adjusts keystone correction. | |
| 6 | CORNER FIT | Adjust the four corners of the image individually. | |
| 7 | USER SET | Enter user settings menu. | |
| 8 | ON SCREEN | Turns the menu display off. Press the button again to turn the menu display on. | |
| 9 | efgh (selector) |
Used for menu operation. | |
| 10 | ENTER | Confirms the item selected during menu operation. |
|
| 11 | MENU | Displays the menu screen for various settings and adjustments. | |
| 12 | FOCUS1 | Lens adjustment: Adjusts the overall focus. | |
| 13 | FOCUS2 | Lens adjustment: adjusts the peripheral focus. | |
| 14 | STATUS | Displays information about the projector. | |
| 15 | PATTERN | Display a test pattern. Switch patterns using the gh keys. | |
| 16 | Numeric keypad "0": Remote control operation lock | Press and hold for 4 s to disable remote control operation. When locking remote control operation, point the remote control at the light receiver on the main unit. This function can be operated only with the remote control. | |
| 17 | ID SET | The unit ID and remote control ID are displayed on the screen. | |
| 18 | SHUTTER | Temporarily turns off the image. Press the button again to resume projection. | |
| 19 | DEFAULT | Restores the selected menu item to its factory default settings. This function can only be operated using the remote control. | |
| 20 | SHIFT | Adjusts the lens shift. | |
| 21 | ZOOM | Adjusts the lens zoom. | |
| 22 | BACK | Returns to the previous menu level during menu operation. | |
| 23 | PICTURE | Switches the picture mode setting. | |
| 24 | LAN | Goes to the LAN setup menu. | |
| 25 | LENS MOTOR | Enables or disables the lens adjustment function. (focus adjustment, shift adjustment, and zoom adjustment operations) | |
| 26 | WARPING BLENDING | Displays the geometric distortion correction/Blend Settings setup menu. | |
| 27 | INPUT | Displays the input menu. | |
| 28 | 4K | Switches 4K mode On/Off. | |
| 29 | HDBaseT™ | Select HDBaseT™. | |
| 30 | STANDBY | Switches the projector to standby mode. | |
| 31 | Remote Output | To use a wired remote control, connect it to the Remote In terminal of the projector using a commercially available ø3.5mm stereo mini-jack cable. | |
b Note
When the remote output terminal is used, infrared signals are not emitted from the remote control.
Remote Control Reception Range
The reception ranges for the projector’s three remote control receivers are as follows:
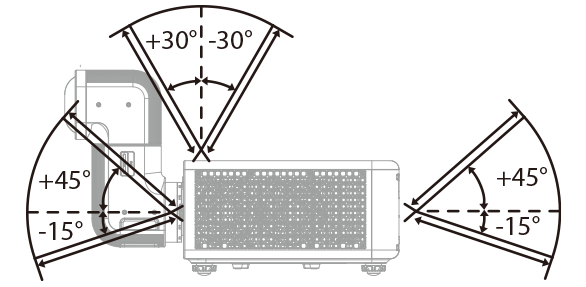
- Angle: ±30°, -15° to 45°
- Distance: Maximum 12 meters (39 feet)
How to Set the ID Number
By setting the remote control ID number, you can operate multiple projectors simultaneously or individually with a single remote control.
Example: Set ID “02”
-
Set the projector ID.
The projector ID default setting is “Off”.
-
A Select projector ID setup (system settings: basic menu).
-
B Select On for projector ID setup in the ID selection display screen. Next, select “02” and press ENTER to confirm.
-
-
Set the remote control ID.
The remote control ID default setting is 00.
-
A
 : Press and hold ID SET on the remote control for 3 s.
y The remote control operation backlight flashes for 3 s and then stays lit.
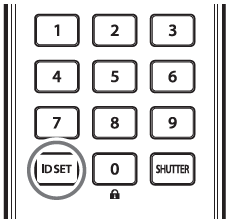
-
B: Press "0" on the 10-key button within 3 s, and then press "2" within 3 s.
-
C: Press ENTER within 3 s.
y The remote control operation indicator light turns off.
-
d Caution
"Once the operation is complete, check that the IDs on the projector and remote control are correct."
Pressing ID SET on the remote control displays the remote control ID (Basic System Setup -> projector ID setup).
b Note
If Projector ID is Off, the projector can be operated with any remote control ID from "00" to "99".