
 .
.SYSTEM SETUP : Advanced
Adjust advanced system settings.
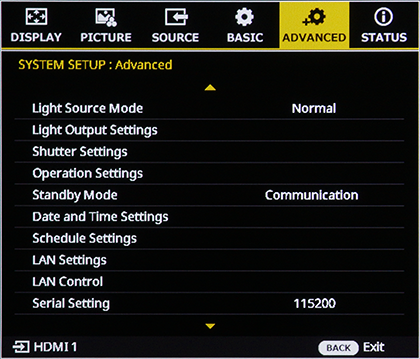
Light Source Mode
Choose a light-source brightness mode.
| Setup | |
|---|---|
| Normal | Eco |
Light Output Settings
Press ENTER to display options and then select the desired item.
Light Output Settings
Adjust Light Output Settings. This cannot be configured when Light Source Mode is set to Eco.
| Setup |
|---|
| 10%~100% |
Brightness Compensation
Select On to optimize the quality of the projected image for various ambient light conditions.
| Setup | |
|---|---|
| On | Off |
b Note
Brightness Compensation is available only when Light Output Settings is between 50% and 80%.
Shutter Setting
Configure settings related to the projector Shutter.
Press ENTER to display options and then select the desired item.
Fade-In
Choose how long the picture takes to fade in after the shutter button is pressed to resume projection.
| Setup | ||||||||||
|---|---|---|---|---|---|---|---|---|---|---|
| Off | 0.5 sec | 1 sec | 1.5 sec | 2 sec | 2.5 sec | 3 sec | 3.5 sec | 4 sec | 4.5 sec | 5 sec |
Fade-Out
Choose how long the picture takes to fade out when the shutter button is pressed to suspend projection.
| Setup | ||||||||||
|---|---|---|---|---|---|---|---|---|---|---|
| Off | 0.5 sec | 1 sec | 1.5 sec | 2 sec | 2.5 sec | 3 sec | 3.5 sec | 4 sec | 4.5 sec | 5 sec |
Startup
Choose the shutter status when the projector is turned on.
| Setup | |
|---|---|
| On | Off |
Operation Settings
Configure timers and other settings.
Press ENTER to display options and then select the desired item.
Direct Power On
When set to On, the projector will turn on automatically (without pressing the power button) if the main power switch is on when power is supplied.
| Setup | |
|---|---|
| On | Off |
Signal Power On
When set to On, the projector will turn on automatically if an Input Signal is detected while in Standby mode.
| Setup | |
|---|---|
| On | Off |
Auto Power Off
"When there is no input signal for more than a certain period of time and the projector is not operated, it automatically goes into standby mode."
b Note
This function is not enabled when a built-in test pattern of this unit is projected.
Choose the length of time before the projector automatically enters standby.
| Setup |
|---|
| 0–180 m |
Sleep Timer
Choose the length of time before the projector automatically enters standby when the sleep timer is enabled.
| Setup |
|---|
| 0.0–16.0 Hours |
Standby Mode
Choose a standby mode.
| Setup | |
|---|---|
| STANDBY | Communication |
- Standby: While in standby, only power-on commands from the control panel, remote control, and serial port are available.
- Communications: While in standby, commands from the control panel, remote control, and serial port, as well as functions enabled via LAN Control, can be used.
Date and Time Settings
Configure date and time settings.
Press ENTER to display options and then select the desired item.
Clock Mode
Choose the clock mode.
| Setup | Description |
|---|---|
| Manual | Manually enter the date and time. |
| NTP | Obtains Date and Time Settings via LAN. Configure Daylight Saving Time, NTP Server IP Address, Time Zone, and Update Interval settings. |
b Note
To set Clock Mode to NTP, an NTP server must be available on the network to which the projector is connected.
Date
Enter a value for the date in [MMDDYYYY] format.
Time
Enter a value for the time in [HH:MM] format.
Daylight Saving Time
Enable or disable daylight saving time.
| Setup | |
|---|---|
| On | Off |
Time Zone
Choose an appropriate time zone for the network clock mode.
| Setup |
|---|
| UTC+14:00 to UTC+00:00 to UTC-12:00 |
Update Interval
Choose the date and time update interval.
| Setup | |
|---|---|
| Hourly | Daily |
Apply
Select Yes when the confirmation screen is displayed to save the Date and Time Settings.
| Setup | |
|---|---|
| Yes | No |
Schedule Settings
Schedule various projector functions at the given date and time.
Press ENTER to display options and then select the desired item.
Schedule Enable
Select On to enable the SCHEDULE.
| Setup | |
|---|---|
| On | Off |
| Item | |||||||
|---|---|---|---|---|---|---|---|
| Daily | Sunday | Monday | Tuesday | Wednesday | Thursday | Friday | Saturday |
b Note
Selecting Daily sets the SCHEDULE for every day of the week.
- Choose a day of the week to display options for the selected day.
- Set Schedule Enable to On.
- Select an event from Event 01–Event 16 and configure the Advanced SCHEDULE settings.
- Setup the event time.
- Select a Function. Function options include Power Settings, Input Source, Light Source Mode, and Shutter. The Event will be disabled if set to Off. Then press ENTER.
- Select the type of event: Event [Power Settings] (Power On, Standby, standby (communication)), Event [Input Source] (HDMI 1, HDMI 2, HDBaseT), Event [Light Source Mode] (Normal, Eco), or Event [Shutter] (Shutter On, Shutter Off). Then, press the ENTER button.
- To reset event settings to the Default Value, select Reset and then select Reset on the confirmation screen. When a confirmation message is displayed, select Yes.
- To copy all event records for that day to another day of the week, select Copy Events To and choose the day of the week. When a confirmation message is displayed, select Yes.
- To reset the event records for a day, select Reset the Day and then select Reset on the confirmation screen. When a confirmation message is displayed, select Yes.
Reset
Restores Schedule Settings to the Default Value.
| Setup | |
|---|---|
| Cancel | Reset |
LAN Settings
Adjust network settings.
Press ENTER to display options and then select the desired item.
Status
View the projector’s connection status (read-only).
MAC Address
View the projector’s MAC address (read-only).
Control Channel
Select the LAN terminal to be used for Projector Control.
| Setup | |
|---|---|
| LAN | HDBaseT |
IPv4 Settings
Configure IPv4 settings.
| Item | Description |
|---|---|
| DHCP | Select On to use DHCP (Dynamic Host Configuration Protocol). When set to Off, the following items can be configured. |
| Projector IP Address | Set the IP address. |
| Subnet Mask | Enter a sub-net mask. |
| Default Gateway | Enter the default gateway address. |
| Primary DNS | Setup the Primary DNS Server address. |
| Secondary DNS | Setup the Secondary DNS Server address. |
| Apply | Press the ENTER button to apply the changes. |
IPv6 Settings
Configure the IPv6 Settings.
| Item | Description |
|---|---|
| DHCP | Select On to use DHCP (Dynamic Host Configuration Protocol). When set to Off, the following items can be configured. |
| Projector IP Address | Set the IP address. |
| Prefix | Set the prefix. |
| Default Gateway | Enter the default gateway address. |
| DNS | Enter a DNS server address. |
| Apply | Press the ENTER button to apply the changes. |
LAN Control
Configure LAN control settings.
| Item | Port Number |
Description |
|---|---|---|
| Crestron Connected® V2 | TCP/UDP 41794 |
Select On to control the projector using a Crestron controller and related software. To disable this function, select Off. Advanced settings are configured on the web control screen. |
| Extron® IP LINK | TCP 4023 |
Select On to control the projector using Extron IP LINK devices. To disable this function, select Off. |
| PJLink™ | TCP/UDP 4352 |
Select On to control the projector using PJLink commands. To disable this function, select Off. |
| AMX® Device Discovery | UDP 9131 |
Select On to control the projector using an AMX device. To disable this function, select Off. |
| Telnet | TCP 3023 |
Select On to control the projector using RS232 commands over a Telnet connection. To disable this function, select Off. |
| HTTP (web control) |
TCP 80 |
Select On to control the projector using a web browser. To disable this function, select Off. |
Serial Setting
Set the baud rate for serial port.
| Setup | ||||
|---|---|---|---|---|
| 9600 | 19200 | 38400 | 57600 | 115200 |
b Note
When performing serial communication via HDBaseT™, the baud rate is fixed at 115200.
User Settings
Save up to five customized settings.
Press ENTER to display options and then select the desired item.
- Select Select Memory and press ENTER. Select the desired memory from Memory 1 through Memory 5 as needed.
- Select any of the following items:
- Load: Loads User Settings from the selected memory.
- Save: Saves User Settings to the selected memory.
- Clear: Reset the settings of the selected memory record to the default values. - Selecting All Clear resets all memory records to their default values.
Filter Settings
| Setup | Description |
|---|---|
| Filter Settings | Manages the filter usage hours of the filter installed in the Projector. Press the ENTER button to display the Setup screen, then select the desired item. |
| Filter Usage Time | Displays the filter usage hours (display only). |
| Filter Usage Reminder Limit | Select the usage time at which the filter replacement message is displayed. Setup: 4000/3500/3000/2500/2000/1500/1000 Hours |
| Reset Filter Usage Hours | Resets the filter usage hours. Execute this function after replacing the filter. |