.
.Installation Overview
- Installation and Storage Guidelines
- Spacing
- Height Adjustment
- Ceiling Mount Installation Precautions
Installation and Storage Guidelines
Do not install or store the unit in the following locations:
- Locations subject to vibration or shock: Areas where vibration from the power supply is transmitted, or inside vehicles or vessels, etc. Such conditions may damage internal components and cause malfunction.
- Near high-voltage power lines or a power supply: These areas may be susceptible to electromagnetic interference.
- Locations with strong magnetic fields: Strong magnetic fields may cause a malfunction.
- Outdoors or in humid or dusty locations: In areas with oil smoke, steam, or corrosive gas, the cabinet may deform or crack, metal parts may corrode, or a malfunction may occur.
- Near the seaside: Exposure to corrosive salt air may result in damage or product malfunction, including the risk of the product falling.
- Near air conditioner vents: Direct exposure to hot or cold air may cause screen flickering.
- Near lighting equipment (such as studio lamps): Sudden changes in Temperature may shorten the lifespan of the light source or cause unit deformation or malfunction.
- Near high-OUTPUT laser equipment: If laser light enters the projection lens, it may cause a malfunction of the DLP chip.
d Caution
If used in a dusty Enviroment, the internal airflow system responsible for cooling and exhaust may become clogged, leading to a reduction in BRIGHT. or damage. Regular maintenance is required to prevent such issues.
d Caution
- Please do not install this unit in an enclosed space.
- "In the event that it must be installed in an enclosed space, please ensure that appropriate air conditioning or ventilation equipment is provided."
- "Insufficient ventilation may cause heat to accumulate, potentially leading to the shutdown of the device."
- "When fixing this unit to the ceiling or wall, please ensure that the mounting screws and power cord do not come into contact with any metal parts inside the wall or ceiling." Contact with metal parts may cause electric shock.
- "Please note that we cannot assume responsibility for any damage to the product caused by improper installation, even during the warranty period."
- If you decide to stop using the product, it is recommended that it be properly removed and disposed of.
Spacing
"When installing the projector, choose a location where the vents will be a safe distance from walls or other obstructions." When installing units one above another using shelves or similar structures, leave a clearance of at least approximately 10 cm between the units and the shelves.
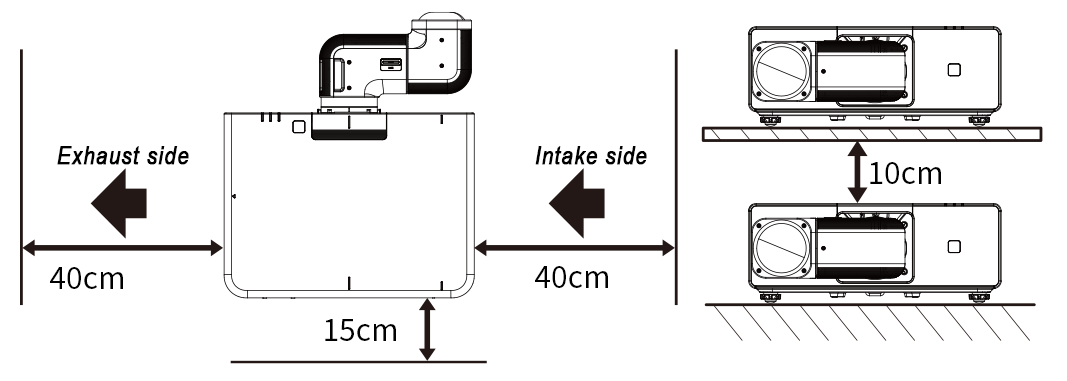
When using projectors side by side, provide installation clearance suitable for the ambient temperature (Ambient Temp). You will also need to ensure that warm air from the exhaust vent does not enter any of the projectors’ intake vents.
| Ambient temperature | Installation clearance |
|---|---|
| ≤ 33 °C | ≥ 0.8 m |
| ≤ 34 °C |
≥ 1.0 m |
| ≤ 39 °C | ≥ 2.0 m |

d Caution
- Do not obstruct the vents. The build-up of heat inside the projector could cause fire.
- After startup, the image may shift by a few pixels until the Lens temperature is stabilized by the laser light source. Check again after 30 minutes to 1 hour. Also, do not adjust (readjust) geometric distortion correction or blending until it stabilizes.
- "If the projector is installed in a location where heat builds up, the image may become unstable." Make sure that the installation meets the conditions described above.
b Note
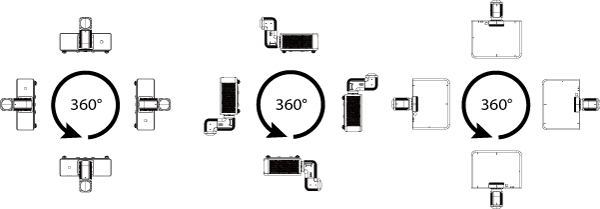
Supports 360-degree omnidirectional installation.
Height Adjustment
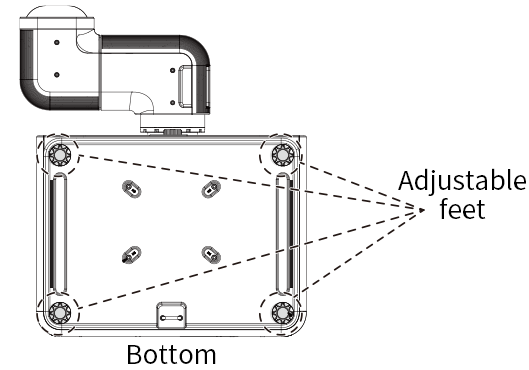
Adjust the height using the adjustable feet. (Approx. 1.9 cm)
Ceiling Mount Installation Precautions
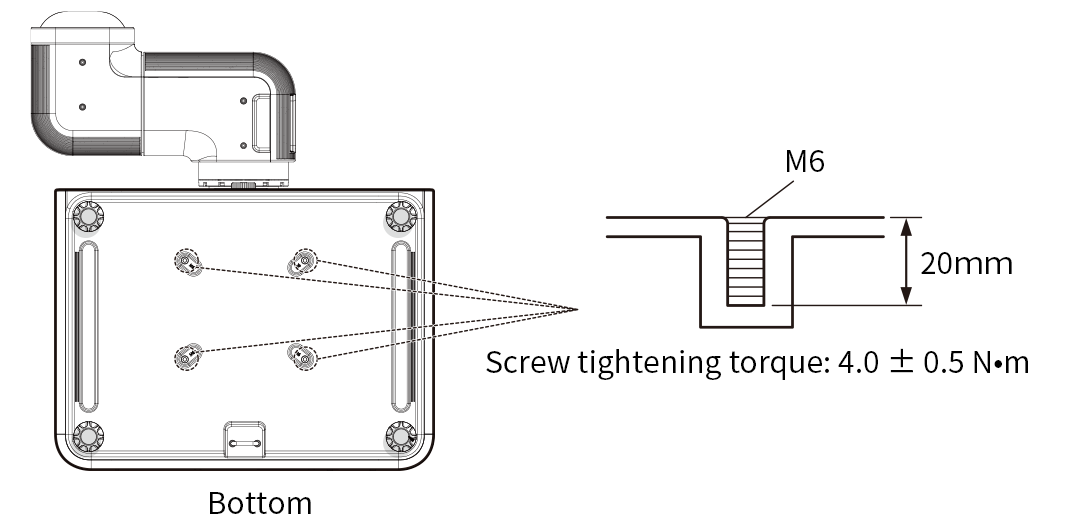
- "When suspending the projector from the ceiling, be sure to use the specified ceiling mount."
- "When installing the projector, attach the drop-prevention kit included with the ceiling mount." Refer to your dealer if you require a drop-prevention kit.
- Ceiling installations should be performed only by qualified technicians.
- See the ceiling mount installation instructions for details.
Ceiling Mount Screw Specifications