
 .
.PICTURE
Adjust the projected image.
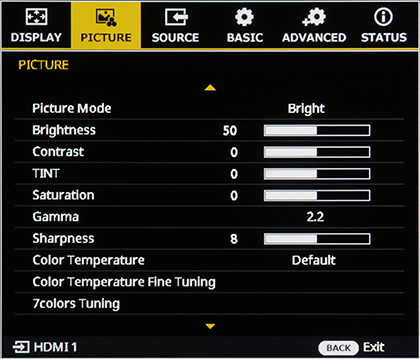
Picture Mode
Select the picture mode.
| Setup | Description |
|---|---|
| Bright | Ideal for use in bright environments. |
| Standard [PROVIA] | Suitable for a wide range of content with standard color reproduction and natural gradation. |
| Vivid [Velvia] | Projects high-contrast images with vibrant color reproduction. |
| Cinema[ETERNA] | Projects images with soft, subdued colors and rich shadow tones. |
| CLASSIC CHROME | Low saturation and high-contrast shadow gradation. |
| CLASSIC Neg. | Enhanced depth through hard tonality and distinct color tones in highlights and shadows, with suppressed saturation. |
| Multi-Projection [sRGB] | Compliant with the sRGB standard. |
| High Speed | Switches to High Speed mode when a 120/240 Hz signal is input. |
| HDR | Switches to HDR mode when an HDR (High Dynamic Range) signal is input. |
b Note
The projector automatically detects the Input Signal and switches to High Speed or HDR mode.
Brightness
Adjust the brightness of the projected image.
| Setup |
|---|
| 0~50~100 |
Contrast
Adjust the Contrast (the difference between bright and dark areas) of the PICTURE.
| Setup |
|---|
| -50~0~50 |
TINT
Adjust colors in the projected image. "The higher the value, the greener the image, the lower the value, the redder the image."
| Setup |
|---|
| -50~0~50 |
Saturation
Adjust the Saturation of the PICTURE. The “+” side makes colors deeper, and the “–” side makes colors lighter.
| Setup |
|---|
| -50~0~50 |
Gamma
Perform gamma adjustment for the PICTURE.
| Setup |
|---|
| 1.6~2.2~3.3 |
Sharpness
Adjust the sharpness of outlines.
| Setup |
|---|
| 1~8~15 |
Color Temperature
Adjusts the color temperature for the projected image.
| Setup | |||||||
|---|---|---|---|---|---|---|---|
| 3200K | 4200K | 5200K | 6200K | 6500K | DEFAULT | 8200K | 9300K |
Color Temperature Fine Tuning
Allows for advanced adjustment of the set color temperature white balance.
Press the ENTER button to display the color temperature fine tuning screen, use the up and down selector buttons to select an item, and use the left and right buttons to adjust.
| Item | Description |
|---|---|
| R Gain | Adjust the contrast of reds. Choose from values between 0 and 200. "The lower the value, the lower the contrast; the higher the value, the higher the contrast." |
| G Gain | Adjust the contrast of greens. Choose from values between 0 and 200. "The lower the value, the lower the contrast; the higher the value, the higher the contrast." |
| B Gain | Adjust the contrast of blues. Choose from values between 0 and 200. "The lower the value, the lower the contrast; the higher the value, the higher the contrast." |
| R Offset | Adjust the brightness of reds. Choose from values between -50 and 50. "Lower values reduce brightness, while higher values increase it" |
| G Offset | Adjust the brightness of greens. Choose from values between -50 and 50. "Lower values reduce brightness, while higher values increase it" |
| B Offset | Adjust the brightness of blues. Choose from values between -50 and 50. "Lower values reduce brightness, while higher values increase it" |
7colors Tuning
"Adjust hue, gain, and saturation for each of seven color channels (R, G, B, C, M, Y, and W)."
Press the ENTER button to display the 7colors Tuning screen, use the left/right selector button to choose a color, and adjust each item.
"Red, Green, Blue, Cyan, Magenta, or Yellow Selected for Color"
| Item | Range |
|---|---|
| Hue | 0 ~ 254 |
| Gain | 0 ~ 254 |
| Saturation | 0 ~ 254 |
White Selected for Color
| Item | Setup |
|---|---|
| R Gain | 0 ~ 254 |
| G Gain | 0 ~ 254 |
| B Gain | 0 ~ 254 |
White Peaking
Adjust the brightness of whites.
| Setup |
|---|
| 0 ~ 100 |
Dynamic Contrast
Configure the dynamic contrast to maximize the contrast of dark content.
Press ENTER to display options and then select the desired item.
DynamicBlack™
When this Function is Enabled, the contrast ratio of the input image is Adjusted automatically. Improves the Black Level of dark scenes by optimizing the light source output.
| Setup | Range |
|---|---|
| On | Enable DynamicBlack™ and Adjust the correction speed and Brightness Level. |
| Off | Disable DynamicBlack™. |
- Speed
: Adjust the correction speed of the light source output. The value range is 1 to 255. Lower value makes the correction slower and less aggressive while a higher value results in the faster correction. - Level
: Adjust the light source when the Brightness Level of the input image falls below the Setup value. The value range is 50% to 100%. "The higher the value, the larger the range to adjust the light source."
Extreme Black
Enabling this function reduces the light source output to a specified Level when a black image is detected.
| Setup | Range |
|---|---|
| On | Enable Extreme Black and configure the Light Out Timer, Light Out Signal Level, and Lights on Threshold. |
| Off | Disable Extreme Black. |
- Light Out Timer
: Setup the amount of time until the light source output is lowered after a Black PICTURE is detected. The Setup range is from 0s to 20s. - Light Out Signal Level
: Setup the Signal Level at which the light source output is lowered. The value range is 1 to 255. - Lighting Threshold
: Setup the threshold to restore the light source output. The value range is 0 to 127.
Reset
Reset the Dynamic Contrast Setup to the Default Value.
| Setup | |
|---|---|
| Cancel | Reset |
b Note
DynamicBlack™ and Extreme Black cannot be used at the same time.