
 .
.SYSTEM SETUP : Basic
Adjust basic system settings.
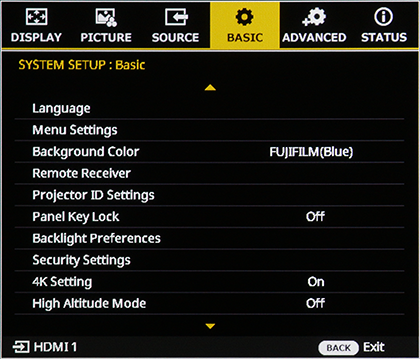
Langouage
Choose the language in which menus and other items are displayed.
| Setup | ||
|---|---|---|
| English | 日本語 | ไทย |
| Français | 한국어 | Norsk |
| Deutsch | Svenska | Bahasa Indonesia |
| Italiano | Nederlands | Tiếng Việt |
| Español | Türkçe | Čeština |
| Русский | Portuguese | Suomi |
| 繁體中文 | Polski | Ελληνικά |
| 简体中文 | Dansk | Magyar |
Menu Settings
Adjust menu display settings.
Press the ENTER button to select Menu Preferences.
Menu Display Time
Choose how long the menus are displayed on the screen.
| Setup | ||||
|---|---|---|---|---|
| 5 sec | 10 sec | 20 sec | 30 sec | Always |
b Note
The operation screens for Lens Shift, Focus 1/2, and Zoom are always displayed for 30 s.
Menu Position
Choose where the menus are displayed on the screen.
| Setup | ||||
|---|---|---|---|---|
| Center | Top Left | Top Right | Bottom Right | Bottom Left |
Reminder Message
Select On to display alerts.
| Setup | |
|---|---|
| On | Off |
b Note
Selecting Off for Reminder Message disables the display of alarm alert messages.
Menu Transparency
Adjust the transaprency of the menu.
| Setup |
|---|
| 0~90 |
Background Color
Choose the menu background color.
| Setup | |||||
|---|---|---|---|---|---|
| FUJIFILM(Blue) | FUJIFILM(White) | FUJIFILM(Black) | Black | Blue | Custom |
b Note
When set to Custom, the factory default is Black. To use a custom background, you must upload a background image using the a web control function.
Remote receiver
Enables or disables the light receiver used by the remote control.
Press ENTER to display options and then select the desired item.
| Setup | Description |
|---|---|
| Front | On / Off |
| Top | On / Off |
| Rear | On / Off |
| HDBaseT | On / Off |
Projector ID Setting
Choose an ID for each projector.
Press ENTER to display options and then select the desired item.
Enable
| Setup | Description |
|---|---|
| Off | Turn the projector ID off. "The projector can be controlled by from any remote, regardless of its ID." |
| On | Choose the projector ID. The remote control must be set to the same ID (refer to the aHow to Set the ID Number). |
Projector ID
Choose the projector ID.
| Setup |
|---|
| 00~99 |
After completing the setup, press the Enter button to apply the changes.
Panel Key Lock
Lock the controls on the body of the projector.
| Setup | |
|---|---|
| On | Off |
b Note
- "To release the control-panel lock, press the selector right for three seconds."
Backlight Preferences
Configure the back light behavior and timeout setting for the panel keys and LED indicator.
Press ENTER to display options and then select the desired item.
Panel Key
Choose how long the backlight remains on when you press the control panel keys.
| Setup | |||||
|---|---|---|---|---|---|
| On | Off | 5 sec | 10 sec | 20 sec | 30 sec |
b Note
- Selecting Off for Panel Key disables the backlight function; selecting On keeps the control panel backlight lit until the projector is turned off.
Indicator
Choose when to light on the LED indicator.
| Setup | ||
|---|---|---|
| On | Off | Warning Errors Only |
Security Settings
Adjust security settings.
Press the ENTER button to change the password.
New Password
- Press ENTER to set a new password.
- Set a four-digit password using a combination of the numbers 0–9.
- You must enter the password twice for confirmation. Press the ENTER button to confirm. The password set here must be entered when Power On Lock is set to On.
Change Password
- Press ENTER and change the password.
- Enter the current password.
- Set a new four-digit password using a combination of the numbers 0–9.
- You must enter the password twice for confirmation. Press the ENTER button to continue.
b Note
- Failure to provide the correct password for three times will prevent the projector being used or initialized. Be careful not to lose the Password. If the Password is lost, please consult your retailer.
Power On Lock
When set to On, you will be prompted to enter the password set in New/Change Password immediately after turning on the Projector.
| Setup | |
|---|---|
| On | Off |
b Note
Selecting On will display the screen to Input the Password.
4K Settings
Set to On to Enable 4K Setting, or Off to disable it.
| Setup | |
|---|---|
| On | Off |
High Altitude Mode
When using the product at high altitudes (approx. 1,500 m/4,900 ft or higher), set High Altitude Mode to On to ensure the System Temperature is correctly Adjust. Failure to observe this precaution could shorten the life of the product's parts.
| Setup | |
|---|---|
| On | Off |
Reset Settings
Restore all items in the selected menu to their factory default settings.
Press the ENTER button, select the menu to be reset, and then execute the reset.
| Setup | Description |
|---|---|
| Display Settings | Resets the display menu to its factory default settings. |
| Picture Settings | Resets the picture menu to its factory default settings. |
| BASIC Settings | Restores the system settings: basic menu to its factory default settings. |
| ADVANCED Settings | Restores the system settings: advanced menu to its factory default settings. |
| Initialize | Resets all menu items (DISPLAY, PICTURE,SYSTEM SETUP : Basic, andSYSTEM SETUP : Advanced) to their Default Value. However, the following menus will not be Reset.
|
b Note
A confirmation screen will be displayed when you select a menu and press ENTER. Select Reset to restore the selected menu item to its Default Value.