 .
.DISPLAY
Adjust projector display settings.
Lens Setting
Adjust lens-related settings.
Highlight the desired lens setting and press ENTER to display options.
| Lens Setting | Description |
|---|---|
| Lens shift | Position the projected image using lens shift. |
| Lens shift settings | Adjust lens shift settings. |
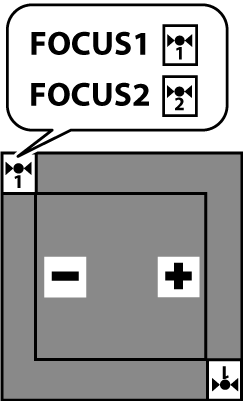
| FOCUS 1 | Adjust focus for the entire image. |
| FOCUS 2 | Adjust focus at the edges of the image. |
| Zoom | Adjust the size of the projected image. |
 Lens shift
Press ENTER to display the lens shift dialog and use the selector (up, down, left, and right) to position the image.
The image can be shifted vertically (V) by up to 70% and horizontally (H) by up to 35%.
The shift value for zero-offset projection (where the lens optical axis is shifted to the bottom edge of the projected image) is 50% in in a vertical (V) direction.
bTIPS
- The current shift position is displayed as a percentage.
- If you keep the lens shift button pressed, shift will pause at a point close to the maximum. Press the button again to further increase shift.
Lens shift settings
Adjust lens shift options.
Press ENTER to display options and then select the desired item.
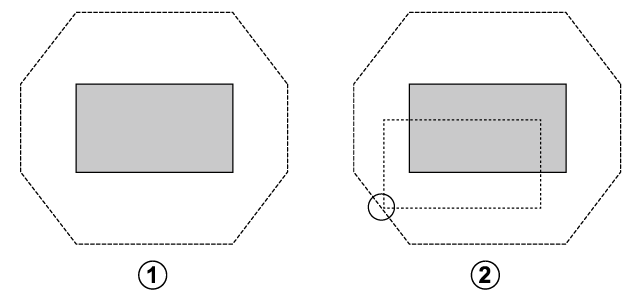
Shift area
Choose how much the lens can be shifted.
| Options | |
|---|---|
| Limited | Full |
-
Limited: Lens shift is restricted, preventing any portion of the image being eclipsed.
A Lens centered
B Image shifted down and to the left: entire image visible
-
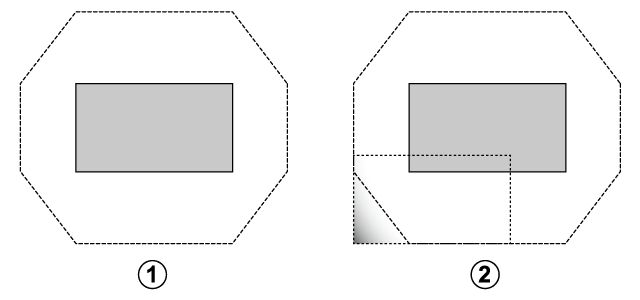
Full: The lens can be shifted throughout its range.
A Lens centered
B Image shifted down and to the left: bottom left corner of image not visible
Auto lens shift
Choose whether lens shift is adjusted automatically.
| Option | Description |
|---|---|
| On | The last-selected shift position will automatically be restored when you rotate the lens. |
| Off | Auto lens shift disabled. |
dCAUTION
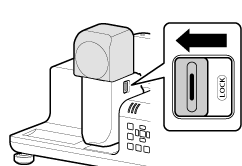
Shift starts once the lens has been rotated and locked. Do not rotate the lens while shift is in progress, as otherwise the product could malfunction.
Home Position
Return the lens to the home position.
Pressing ENTER displays a prompt asking whether you wish to return the lens to the home shift position.
Press OK to start lens shift. Do not perform any other operations until the projector displays a message stating that reset is complete.
bTIP
The lens can also be returned to the home position by holding the SHIFT button on the remote control for over three seconds.
 FOCUS 1/
 FOCUS 2
Adjust focus.
Press ENTER to display the focus dialog and use the selector (left or right ) to adjust focus (aAdjusting Focus).
 Zoom
Zoom
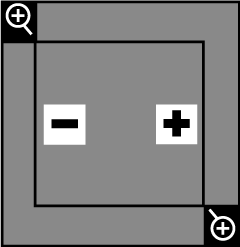
Adjust the size of the projected image.
Press ENTER to display the zoom dialog and use the selector (up, down, left, and right) to adjust the size of the projected image.
Select “−” to make the image smaller, “+” to make it larger.
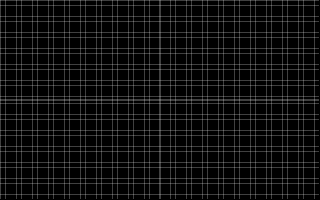
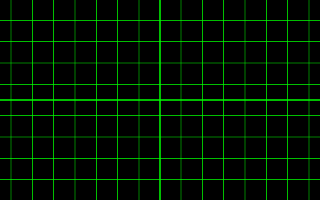
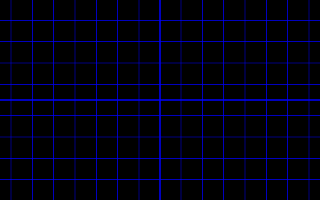
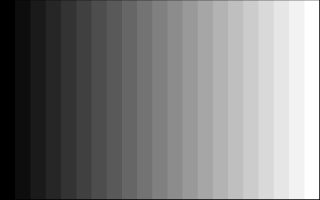
Test Pattern
Choose a grid or other test pattern for display during installation.
| Options | |||||||||||||
|---|---|---|---|---|---|---|---|---|---|---|---|---|---|
| Off | 1 | 2 | 3 | 4 | 5 | 6 | 7 | 8 | 9 | 10 | 11 | 12 | 13 |
Test pattern 1
Test pattern 2

Test pattern 3
Test pattern 4
Test pattern 5

Test pattern 6
Test pattern 7

Test pattern 8

Test pattern 9

Test pattern 10

Test pattern 11

Test pattern 12
Test pattern 13
bTIP
To turn the test pattern off, select Off in the menu or repeatedly press the PATTERN button on the remote control until the pattern is no longer displayed.
Projector Position
Position the beam according to the projector’s location.
| Options | |||
|---|---|---|---|
| Front Table | Rear Table | Rear Ceiling | Front Ceiling |
-
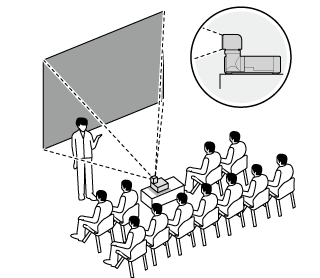
Front Table: Choose if the projector is on a table in front of the screen.
-
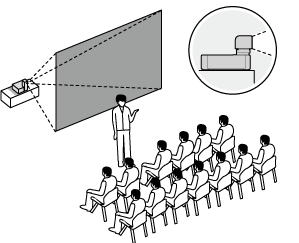
Rear Table: Choose if the projector is on a table behind the screen.
-
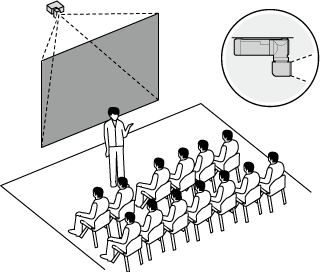
Rear Ceiling: Choose if the projector is suspended from the ceiling behind the screen.
-
Front Ceiling: Choose if the projector is suspended from the ceiling in front of the screen.
Aspect Ratio
Choose the aspect ratio of the projected image.
| Options | ||||
|---|---|---|---|---|
| Auto | Real | 4:3 | 16:10 | 16:9 |
bTIP
The setting for each input is stored separately.
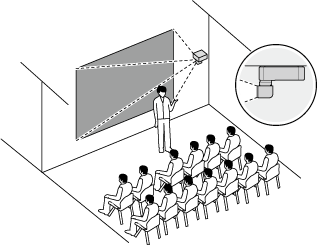
Keystone
Use keystone compensation to correct “keystoning” and make the sides of the projected image parallel the edges of the screen.
Press ENTER to display the keystone compensation dialog and use the selector (up, down, left, and right) to correct keystone distortion.
Negative values reduce the size of the projected image while positive values increase it.
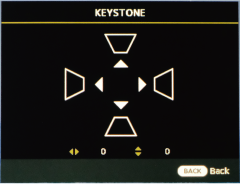
| Axis | Range |
|---|---|
| Vertical (V) | -60 — 60 |
| Horizontal (H) | -60 — 60 |
Corner Fit
Position the corners of the projected image to correct distortion.
-
Press ENTER to display corner fit settings.
-
Highlight a corner using the selector (up, down, left, and right) and press ENTER.
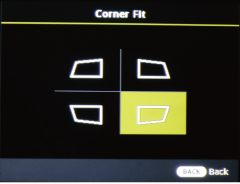
-
Position the corner horizontally and vertically.
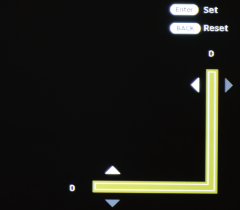
Axis Range Vertical (V) 0 — 60 Horizontal (H) 0 — 60 -
Press ENTER to save changes and exit.
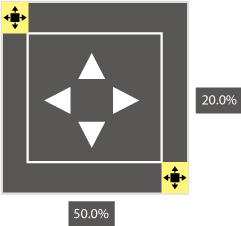
Blanking
The screen margins can be adjusted vertically by 300 pixels and horizontally 500 pixels. The maximum amount for either the left or right margin is 500 pixels, but the maximum for both margins combined is 960 pixels.
![]()
| Options and ranges | |||
|---|---|---|---|
| Upper 300 pixels |
Lower 300 pixels |
Left 500 pixels |
Right 500 pixels |
Press the selector up or down to highlight the desired margin and press left or right to adjust.
bTIP
You may not be able to adjust the left and right margins at some aspect ratios.
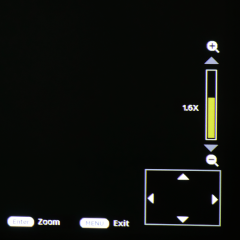
Digital Zoom
Zoom the projected image in using digital zoom.
Highlight Digital Zoom in the DISPLAY menu and press ENTER to display a digital zoom window at the bottom right corner of the screen.
Press the selector up or down to choose the magnification (maximum 2×).
| Options |
|---|
| 1.0 — 2.0 |
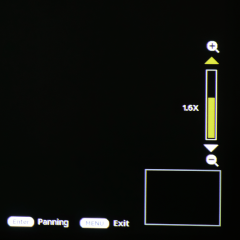
Press ENTER in the digital zoom display and press the selector up, down, left, or right to scroll the zoom display.
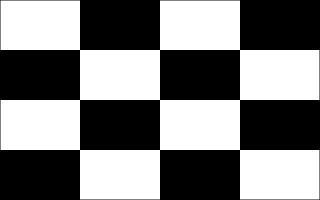
Raster Position
Input images that do not fill the display can be positioned as desired within the screen.
Image with an aspect ratio of 16∶9 displayed on a screen with an aspect ratio of 16∶10
A Display area aspect ratio: 16∶10
B Image aspect ratio: 16∶9
C Projected image can be moved 60 pixels up or down
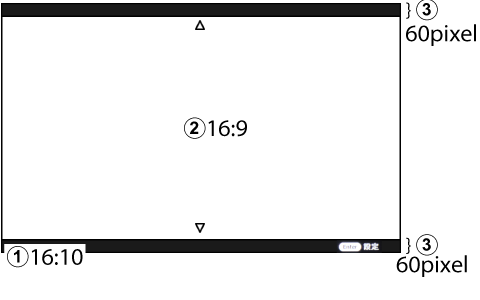
bTIP
To return the projected image to its original position, press the DEFAULT button on the remote control during adjustment.
Lens Rotation setting
Adjust lens rotation settings.
Highlight a lens rotation item and press ENTER to view options.
Project on Rotating
Choose whether the projector lamp remains on while the lens is rotated.
| Option | Description |
|---|---|
| On | The lamp remains on while the lens is rotated. |
| Off | The lamp turns off while the lens is rotated. |
Image Rotation
Choose whether the projector automatically rotates images to match lens rotation.
| Option | Description |
|---|---|
| Auto | The projector detects lens rotation and rotates images to match. |
| Off | Automatic image rotation disabled. |
Upside on Vertical Image
Choose the side on which the top of portrait-orientation pictures appears when Auto is selected for Image Rotation.
| Option | Description |
|---|---|
| L-SIDE | Pictures are rotated so that the top is on the left. |
| R-SIDE | Pictures are rotated so that the top is on the right. |
bTIP
The setting takes effect only after the lens has been rotated and locked. It has no effect until the lens is locked.